Side Imaging vs Down Imaging: Which Sonar View You Actually Need

This post may contain affiliate links. Read our policy.
Side Imaging vs Down Imaging: Which Sonar View You Actually Need
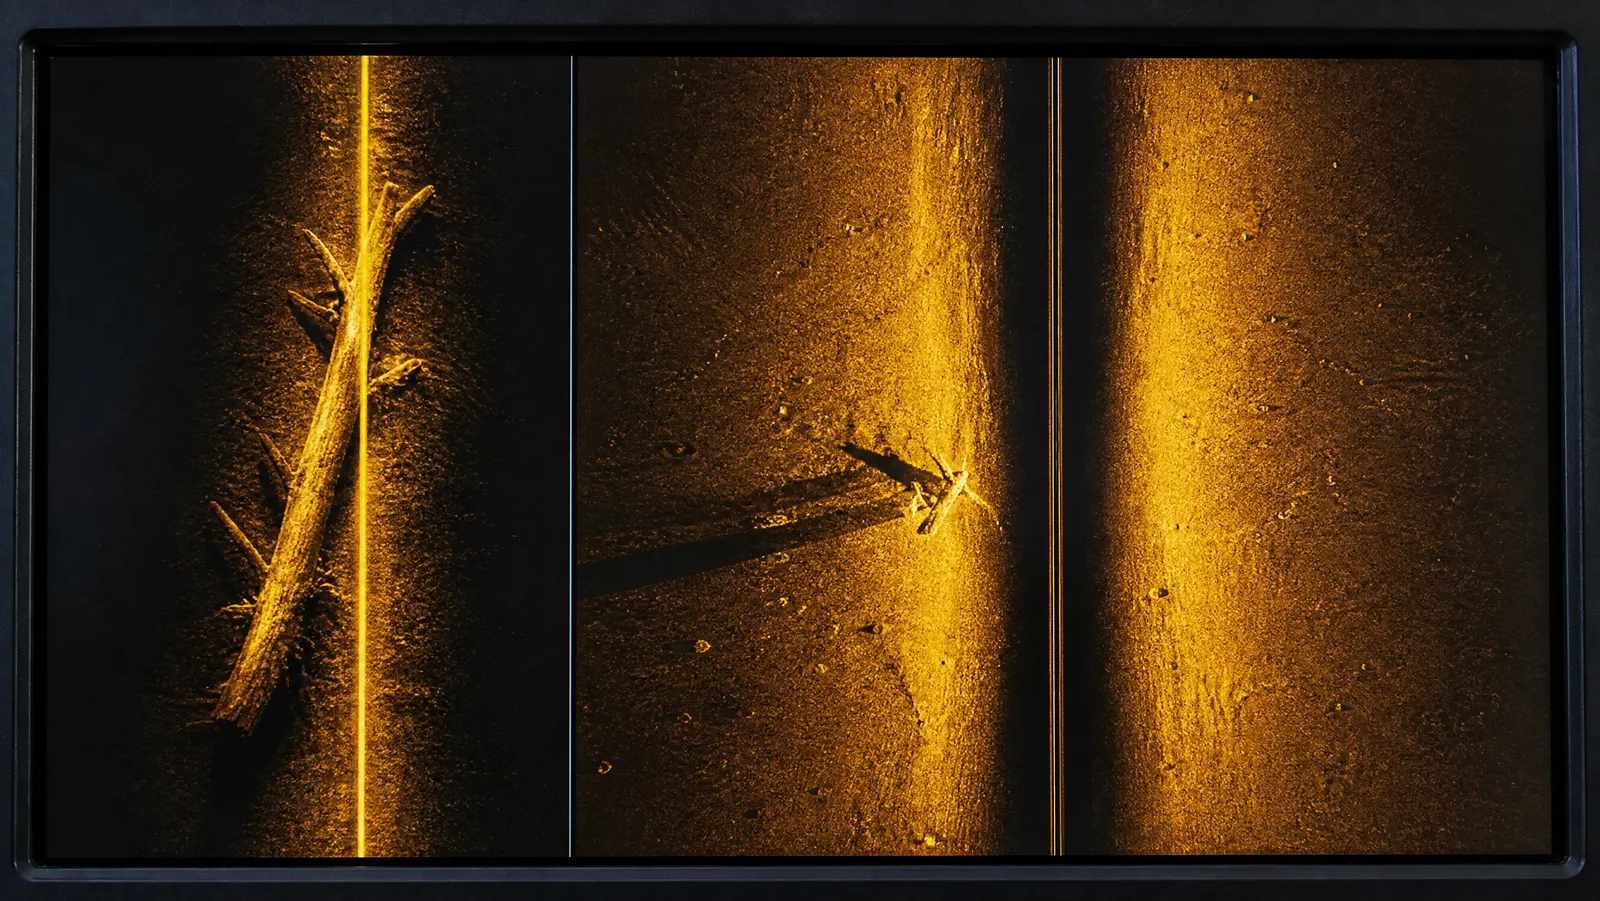
Down imaging is a thin, high-frequency slice of water directly beneath the hull. Side imaging fans that same high-frequency beam out to both sides and sweeps a wide corridor of bottom as you idle. One is for detail under you. The other is for finding the things you would otherwise drive straight past.
That is the whole comparison in two sentences, and for plenty of anglers it settles the question. The trouble starts at the checkout page, because side imaging almost always costs a tier more, and the marketing copy for both views leans on the same three words: picture-like, razor-thin, photographic.
So here is the long version. How each beam is actually shaped, what each one is honestly good at, where side imaging quietly falls apart, and which view we would buy first depending on the water you fish. If you are still deciding what kind of unit to own at all, start with our complete fish finder guide and come back here to choose a view.
How Each Beam Is Actually Shaped
Both views come out of the same family of high-frequency transducer elements. What separates them is aim.
Look at what a manufacturer publishes and the family resemblance is obvious. In the specifications for the ECHOMAP UHD2, Garmin lists ClearVü CHIRP and SideVü CHIRP at the identical frequency set — 260, 455, 800, 1000, and 1200 kHz — both running 500 watts. Same hardware language, same power, different direction.
- Down imaging aims that element straight down. The beam is very wide side to side but extremely thin front to back, so each ping samples a narrow ribbon of bottom. The unit stacks those ribbons in order and scrolls them across the screen as a continuous picture.
- Side imaging aims two of those thin beams outward, one per side, at a shallow angle across the bottom. Humminbird describes its side beams as extremely narrow front to back yet very wide from top to bottom, producing thin slices that get assembled into an image as the boat moves.
The thinness is the point. A wide, round cone averages everything inside it into a blurry return. A knife-thin beam resolves individual branches on a laydown. You buy imaging for resolution, and you pay for that resolution in frequency, which you pay for again in depth range.
Down Imaging Explained: Detail Directly Under the Boat
Down imaging answers one question extremely well: what exactly am I sitting on?
Idle over a brush pile with down imaging running and you get limbs, not a blob. You can count trunks in a standing timber flat, see where the grass line stops and the gravel starts, and watch bait stack in the branches instead of guessing from a smear of color. Depth is on the left axis, time scrolls right to left, and the image looks close enough to a photograph that most anglers need no training to interpret it.
It is also the cheaper half of this comparison. Down imaging shows up well down the price ladder — Garmin's "cv" models and Humminbird's Down Imaging units start far below the side-scanning tier — and it needs no special boat-handling technique. Sit still and you still get a usable picture of what is underneath you.
What it cannot do is cover water. A down beam sees a strip only a little wider than the water is deep — Humminbird publishes a 75-degree side-to-side coverage angle for its 455 kHz down imaging beam, which works out to roughly one and a half times depth. On a 12-foot flat, that is a hallway. You could idle within 30 feet of the best laydown on the lake all afternoon and never know.
Fish Finder Side Scan Explained: A Corridor Instead of a Line
Side imaging trades that vertical detail for horizontal reach, and the reach is dramatic. Garmin keeps its own wording plain — in its owner's manuals, SideVü scanning sonar "shows you a picture of what lies to the sides of the boat," offered as a search tool for finding structure and fish. Humminbird puts a number on it: its Side Imaging beams scan up to 400 feet to the left and right of the boat, for total coverage of up to 800 feet in a single pass.
That number is the entire argument. One idle down a bluff wall covers what would take a dozen passes with a down-looking view.
Coverage and detail trade against each other, and the manufacturers are open about it. In Humminbird's own transducer guidance, the 455 kHz side imaging setting is the one rated for deep-water performance and overall coverage up to 800 feet side to side, while 800 kHz buys sharper returns and gives up range, reaching only about 250 feet side to side. At the top of the range, MEGA Imaging runs at 1.2 MHz, and Humminbird rates MEGA Side Imaging+ for clear viewing out to 200 feet on either side. Note the shape of that tradeoff: the sharpest picture is not the one that reaches farthest.
What side imaging is genuinely good at:
- Finding isolated cover — a single stump, a sunken boat, a rock pile — that no map shows.
- Scanning docks, laydowns, and shallow flats without driving over them and spooking fish.
- Mapping the edge of a grass bed or a channel swing in one pass instead of ten.
- Marking waypoints on targets 100 feet away that you can come back and fish properly.
Side Imaging vs Down Imaging, Head to Head
Beam aim. Down imaging looks straight down. Side imaging fires outward, to both sides at once.
Coverage per pass. Down imaging covers roughly the width of your depth. Side imaging covers hundreds of feet per side.
Best job. Down imaging confirms what is under you. Side imaging searches for what you have not found yet.
Does the boat have to be moving? Down imaging, no. Side imaging, yes — the picture is built from forward motion.
Depth tolerance. Down imaging holds up better as you go deeper. Side imaging degrades fast in deep water.
Learning curve. Down imaging is low. Side imaging is real, and it is mostly shadow reading.
Typical cost. Down imaging is standard on mid-range units. Side imaging usually costs a model tier above.
Read that comparison as a workflow rather than a winner. Side imaging finds it, down imaging confirms it. Anglers who own both tend to spend the first hour of the day searching and the rest of it sitting on what they found.
CHIRP vs Side Imaging: Why the 2D View Still Earns Its Space
Neither imaging view replaces traditional 2D sonar, and the specification sheet explains why. In the same ECHOMAP UHD2 documentation where Garmin lists imaging at 260 kHz and up, traditional CHIRP runs at 50, 77, 83, and 200 kHz, and Garmin rates the maximum sonar depth at 2,300 feet at 77 kHz. Low frequency travels. High frequency resolves. You cannot have both in one beam.
The practical difference shows up in how fish look. Imaging draws targets as bright dots, dashes, and blobs, because a fish crosses those knife-thin beams too fast to trace anything else. Traditional 2D draws the arch — and the arch carries information the picture does not, including how long the fish stayed in the beam, how hard the bottom is, and where the thermocline sits. If those marks are still a mystery, our guide on how to read a fish finder is the hour of homework that makes every other view worth owning.
And live sonar is a third thing again, not a better version of either. A forward-facing sonar system shows you a narrow wedge of water in real time, in the direction you point it, which is an engaging tool rather than a searching one. It answers "is that fish reacting to my bait," not "what is out there."
Reading Shadows: The Skill Side Imaging Demands
Here is the part nobody warns you about. A side imaging picture is not a photograph, it is a shadow puppet show, and the shadows carry most of the information.
The physics is the same one hydrographers use. According to NOAA Ocean Exploration, a side-scan picture is made up of dark and light areas: hard objects protruding from the bottom send a strong echo, while shadows and soft areas such as mud and sand send weaker echoes. NOAA draws those strong echoes dark and the weak ones light; fishing units generally invert that palette, so on your screen a hard return is the bright mark and its shadow is the dark streak trailing away from the boat. Either way, the shadow is carrying the information.
Translate that to a bass boat and three habits follow:
- Judge height by the shadow, not the object. A long dark streak behind a bright return means something tall. A stump with almost no shadow is a stub.
- Distrust the bright water directly under the boat. The nadir strip beneath the hull is where side imaging is weakest, because the beams are hitting at a steep angle. That column is what down imaging is for.
- Remember the image is stitched, not snapped. Turn the boat, speed up, or slow down mid-pass and the geometry stretches or compresses. The picture lies about distance before it lies about anything else.
Anglers consistently report that the first month with side imaging produces more waypoints on trash than on cover. That is normal. Idle over targets you have already identified, look at how they render, and let the vocabulary build.
Where Side Imaging Falls Apart: Speed and Depth
Side imaging has two hard limits, and both are published.
Depth. For the StructureScan HD system, Lowrance rates SideScan imaging to a maximum depth of 150 feet while rating DownScan imaging to 300 feet — the down-looking view goes twice as deep from the same box. That gap is structural, not a quirk of one product. Side beams travel at a shallow angle across the bottom, so they run out of energy long before a beam aimed straight down does. If you fish deep reservoirs or offshore structure, side imaging is doing less of your work than the brochure implies.
Speed. Lowrance lists optimum imaging speed at 2 to 8 mph for both SideScan and DownScan. Humminbird gives the same 2-to-8 mph window for best side imaging detail. Push past that and the image stretches and smears. Stop entirely and it fails differently — Humminbird notes that with no boat movement the side beams keep scanning the same spot instead of building an image of new ground. Side imaging is a moving tool. On anchor it is decoration.
What Imaging Costs to Add
Down imaging is nearly free at this point, in the sense that it comes standard on units people already buy. Side imaging is the upcharge, and it is usually enforced by model name: Garmin's "sv" chartplotters are the ones that carry SideVü, while the "cv" models are ClearVü only, and on Humminbird's HELIX line side imaging means stepping to a different unit entirely.
For scale on the entry point, Garmin introduced the ECHOMAP UHD2 chartplotter series with suggested retail prices ranging from $399.99 to $649.99, and the SideVü-equipped sv models generally sit toward the upper end of a range like that. If you are shopping the value tier rather than the tournament tier, our roundup of the best fish finder for the money covers what you actually give up below the side-imaging price break.
Both Views Need the Right Transducer
The head unit is only half the purchase. Imaging is generated by the sensor in the water, so a side-imaging-capable display paired with a plain 2D sensor gives you a menu you cannot use. Check that the bundle includes an imaging transducer, that your transom or trolling motor can physically accept it, and that the mount holds it dead level — a sensor tilted a few degrees skews the whole side picture. Fish finder transducers are the single most common reason a new unit underperforms, and the fix is almost always mounting rather than settings.
The Bottom Line: Which View to Buy First
Buy for the water you actually fish, not the water in the ad.
- Shallow lakes, rivers, flats, and unmapped water: side imaging first. Under about 20 feet, coverage is worth more than resolution, and finding one unpressured laydown pays for the upgrade.
- Deep reservoirs, ledges, and offshore structure: down imaging plus traditional CHIRP first. Below the 150-foot side-scan ceiling Lowrance publishes, the corridor view has already stopped contributing.
- Docks, brush, and heavily pressured community water: side imaging, because scanning without driving over fish is the entire advantage.
- Vertical fishing, ice, or crappie over brush: down imaging, every time.
- One boat, one budget, no idea: get a unit with good 2D CHIRP and down imaging, learn to read it cold, and add side imaging when you can name the specific thing you are failing to find.
In our view the honest framing is that these are not competitors. Side imaging is how you find water worth fishing; down imaging is how you decide whether to make the cast. For the full breakdown of screens, brands, transducers, and price tiers, start with our guide to the best fish finders and buy the view that matches your lake.
About The Author
Rob Thomas
Rob Thomas is a fisherman who loves catching tales from his fellow fishermen. He always enjoys a good story, especially when it comes from the sea.